23 Mar

Data Acquisition (DAQ) Using Python

It is VERY easy to interface with hardware using Python. While I am definitely not a Python expert, I thought it would still be worthwhile to write this quick post. How many times have you wanted to connect a microcontroller based project up to the computer to either save data or control something via a simple program?

In my previous post I discussed using a thermistor for our toaster oven based reflow oven. The next step for our toaster oven is to see how well it can follow a temperature curve. The Python code below will allow us to log/acquire the temperature of our oven over a set duration (a few minutes). While the example presented here is specifically for saving raw data to a file (to be read in MATLAB), it can be used in any application. For example, I am currently using Python to interface with a Bluetooth Low Energy breakout board (buy one now at our store!).

This simple code will receive a single byte of data over a virtual serial port and save it to a file. The code actually does not need to be modified to receive 16-bit values. While this example will acquire data for a specific duration of time, Python can be used to interface directly with a microcontroller for any number of applications. Be sure to install pySerial, otherwise this will not work.

Change the sample rate (fs) and the duration to match your application. Set the COM port and baud rate. Specify the file name where you want to save the data, and then run the script. The code should be fairly self explanatory.

Now that we have a file which contains our data, time to do something with it! The MATLAB (Octave) code below will read in a file which contains 16-bit values and plot it.

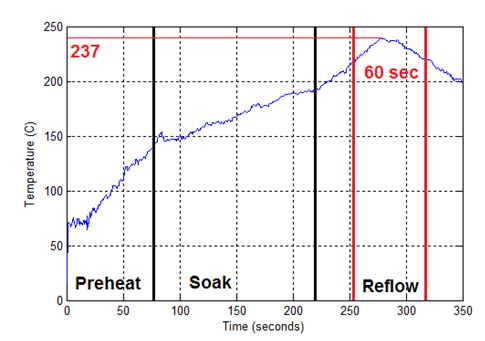
This is all you need to interface your next project with your computer or to test out your toaster oven reflow oven. The example below shows the entire temperature curve from a test run of the toaster oven. Stay tuned for more cool projects!

Python Acquired Temperature

Python Acquired Temperature

10 Jan

Using a Thermistor

Now that we have modified our toaster oven’s wiring and created a relay PCB to control the toaster oven, we need a way to measure the internal temperature. Throughout the reflow process, it is possible for the internal temperature of the toaster to reach 300C, so it is important to ensure that the temperature sensor chosen can function up to 300C.

There are many different ways to measure temperature using a microcontroller. The three main options include a thermistor, thermocouple, or RTD (resistance temperature detector). Although the thermistor is not the most straight forward method for measuring temperature, it is the cheapest method. Many thermistors also have a maximum temperature of 300C. While, this is cutting it quite close, we will rarely need temperatures over 250C. This is why I have chosen to use a thermistor for my toaster over.

Choosing a Thermistor

Choosing a thermistor can be quite simple, but there are tons of options. I ended up using a thermistor I had left over from my RepRap build, but almost any will do (as long as it can handle the temperature range we need).

There are a few things you should know about thermistors before choosing one. A thermistor’s resistance changes based on its temperature. In addition to a the thermistor having a specified maximum and minimum temperature, a baseline resistance, and tolerance will be given. The baseline resistance given is the thermistor’s resistance at 25C. Note, the resistance will change as the temperature changes. For our application, the tolerance doesn’t really matter since we do not require our toaster oven to be perfectly accurate.

Once you have chosen a thermistor take a look at its datasheet, there should be a “truth table” showing the resistance for each temperature. I used this thermistor, but I actually recommend that you use this one. It is cheaper, and my thermistor has flexible leads which make it more difficult to work with.

Installing a Thermistor

Before describing how to measure an actual temperature using your thermistor, I want to discuss how it should be installed into your toaster oven. An important thing to consider when using a thermistor in a high temperature environment, is that solder cannot be used since it will melt. Additionally, most wires cannot handle such a hot environment. Sadly, high temperature wires can be somewhat expensive and many are only rated to 250C.
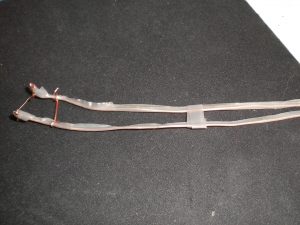
My thermistor hooked up to wires wrapped in PTFE tape (I ran out of Kapton Tape)

My thermistor hooked up to wires wrapped in PTFE tape (I ran out of Kapton Tape)

A [reasonably] cheap solution is to remove the insulation off of a solid wire and cover it with Kapton Tape so there are no shorts. Kapton Tape is a very high temperature tape which can prevent the wires from making electrical contact with each other and the inside of the oven, it is also used when building a RepRap extruder. Finally, we need a way to connect the thermistor to our makeshift high temperature wire. If you are using a thermistor with flexible leads, just wrap it around a bunch of times and them tape it up with the Kapton Tape. A better method for the thermistors without flexible leads, is to crimp the leads to the wire, just be sure to remove any plastic which can melt before installation.

Here are some pictures from my build. One last thing to note: you will need to drill a hole in the toaster oven’s interior for the thermistor wires to go through. Use a Dremel or a hand drill. Don’t forget to wear safety goggles!
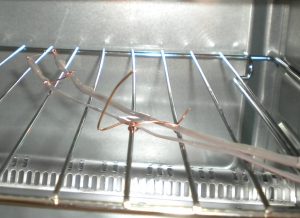
Thermistor and wire assembly attached to the inside of my toaster oven.
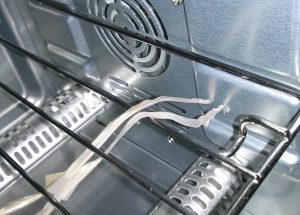
Thermistor and wire assembly attached to the inside of my toaster oven.

The two holes for the thermistor wires.

The two holes for the thermistor wires.

Converting Resistance to Temperature

You are probably thinking, “Great! We have the thermistor installed, but how do we use it to actually measure temperature?” From a high level, we must convert a resistance to temperature. While you don’t necessarily need to do this, and you definitely don’t need to do it in MATLAB (or Octave), I highly recommend that you plot the table in your thermistor’s datasheet.
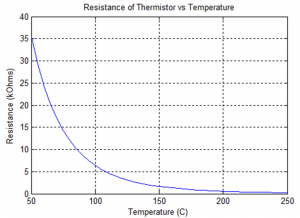
Thermistor resistance as a function of temperature.

Thermistor resistance as a function of temperature.

Take a look at the higher temperatures (over 150C) and let’s assume that we can digitize that curve directly using an analog to digital converter (ADC), we still have a big problem; digitizing this curve would not provide us with enough accuracy in the most important temperature range. For example (hypothetically), an ADC value of 253 would represent 215C and 254 would represent 235C. Given that there always exists noise in any analog to digital conversion, we would not be able to accurately measure the temperature over approximately 100C.

To fix this problem, we somehow need to make the resistance change more uniformly over higher temperatures, like the lower temperatures currently do. This will correspond to a higher accuracy when digitizing the signal. Typically, the first step to measuring resistance is to convert it to a voltage. The easiest way to do this is to use a voltage divider.
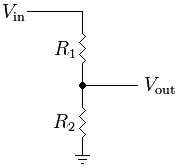
Voltage divider

Image from Wikipedia

Vout = Vin*R2/(R1+R2)

Choose a resistor, use this equation, and then plot the voltage against temperature. We still have the same problem, when converted to digital the higher temperatures will not have enough resolution. I have a simple solution. It is out of the scope of this blog post for me to explain how I decided to use this method, so I will just give you my solution.
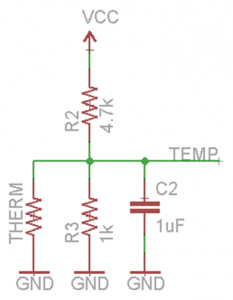
The circuit I used to transform the thermistor's resistance into voltage.

The circuit I used to transform the thermistor’s resistance into voltage.

Req = 1/(1/Rtherm + 1/R3)

Vtemp = Req/(R2+Req)

Simply use the above equation to convert the thermistor resistor to the voltage  on “TEMP”. Req is the equivalent resistance of R3 in parallel with the thermistor resistance  Vtemp is the voltage at signal “TEMP”. Don’t worry about the capacitor, that is only there to keep transient spikes to a minimum, it does not effect the final temperature measurement. You can then plot the results in either MATLAB, Octave, or Excel. One thing to note, is that Vtemp will most likely not be very large. You amplify the signal as needed, depending on what the voltage is at room temperature. This can be done using a non-inverting op-amp circuit. I used a voltage follower in order to buffer the signal that the ADC resistance does not affect the calculated resistance.

Additionally, you can convert the output voltage into an ADC value. Note how the curve is more uniformly spread out across all temperatures. Here is the result plotted via MATLAB:
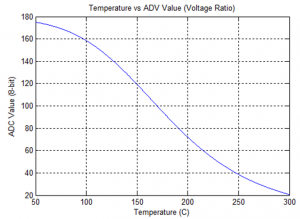
Plot of the ADC value (for a 8-bit ADC) against different temperatures.

Plot of the ADC value (for a 8-bit ADC) against different temperatures.

Looks great! Doesn’t it? Now all we need to do is create a lookup table (LUT) for our microcontroller. Any microcontroller will do. Instead of typing out each value, I generated the LUT array in MATLAB. The LUT takes in an ADC value and then spits out the correct temperature. Please note that this method will not be perfectly accurate and if you want better accuracy you will have to calibrate the sensor manually. When comparing my results to an oven thermometer, it is more than accurate enough for a reflow toaster oven. For your convenience, here is the LUT I used in my MSP430 code (build in Code Composer Studio). For more information on the MSP430, check out my other blog: NJC’s MSP430 LaunchPad Blog.
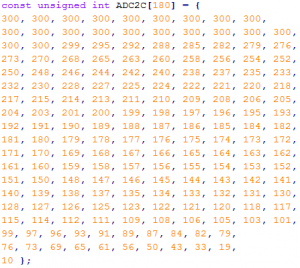
This is the thermistor LUT I used on the MSP430.

This is the thermistor LUT I used on the MSP430.

Conclusion

The method I used here to generate a LUT for our thermistor can be used with any sensor. MATLAB (Octave) is a great tool and is quite easy to use. Now that we can accurately read a temperature on a microcontroller, we are almost done with our toaster oven reflow oven project. All that remains is integrating everything together into one nice package and creating the control system, which will be done by the MSP430.

All of my MATLAB code is provided below. Please note that it is not very well commented, it is provided only as a reference. If you have questions about anything specific, please contact me or leave a comment.

 Useful Links

18 Jul

Relay Circuit and Breakout Board

Before continuing with our toaster oven “reflow oven” project, we should understand how relays work and how to build a simple relay breakout board. This post will discuss the design of a relay breakout board specifically for our reflow oven project.

Disclaimer: As I mentioned in the previous post, do not attempt this project unless you know what you are doing. High voltages are dangerous and can kill you. Do this project at your own risk! This part is especially dangerous, as we are dealing directly with high voltage signals.

Introduction to Relays

The goal of a relay is to control high power devices using low power signals. A perfect example is controlling a 1500W toaster oven with a 3.3V or 5V microcontroller. Another example would be using a microcontroller to turn on or off lights in your house/apartment/dorm. Although the two examples I just gave involve turning on or off AC power to a device, relays can also switch high power DC signals such as headlights on a car.

While there are many different methods you can use for switching AC devices, I will only mention three of them. The first method uses a triac, the second uses a solid state relay, and the third uses an electromechanical relay. The first two methods are solid state, which means there are no moving parts; there are many advantages to using these two methods. The downside of using a triac circuit, is that it is not trivial to build. The downside of using a solid state relays is that it can be very expensive compared to electromechanical relays.

Relay Internals

Relay Internals (image from Wikipedia)

For this post, we will focus on electromechanical relays due to how easy they are to use and how inexpensive they are. Check out the Wikipedia page for a more detailed description of how relays work. To summarize, relays contains a coil (basically an inductor) which either forces a magnetic switch on or off; when current is flowing through the coil, the relay is “on”.

It is also important to note that relays won’t turn on until a certain amount of current is flowing through the coil. Many times, this current exceeds what a microcontroller can output so a transistor is needed to boost the current going into the coil.

Choosing a Relay

The first thing you need to determine when choosing a relay, is the maximum current and voltage you want the relay to control. For this project, my toaster oven has a maximum rated power of 1500W at 120V. It is important to find your maximum power, which is typically listed on every device. Using the following equation we can determine the maximum current the relay must switch on and off.

P = I * V

This is a very simple, yet useful equation; power is equal to current times voltage. Using this equation, the maximum current we need to design for is 12.5A. In engineering, it is always important to over-specify your system. Despite the fact that we only need to design for a maximum of 12.5A, we should design for 15A. This is a lot of current, way more than most devices will ever use. It is better to be safe than sorry!

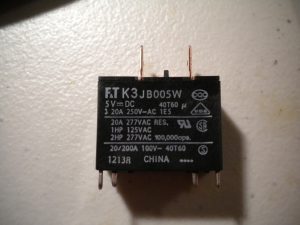
Finally, the coil voltage and activation current must be determined. Since relays which can be turned on using a coil voltage of 3.3V or lower are expensive, we will be using a relay that has a coil voltage of 5V. This is great for those of you using a 5V microcontroller. Now that we know the coil voltage, we must find the cheapest relay which has the lowest turn on current. For my specific relay, this is denoted as “Operate power”. Given an operating power of 380mW and a voltage of 5V, the coil requires a minimum current of 76mA to turn on the relay. Since my coil requires more power than a microcontroller pin can drive, a transistor circuit will be needed.

20A Fujitsu Relay with 250 tab connections.

20A Fujitsu Relay with 250 tab connections.

Fujitsu Relay – 20A Heavy Load FTR-K3 Series

The last thing to note about the relay I have chosen, is that it is available with “#250 tab terminals”. As I mentioned in the previous post, this will greatly simplify things!

Relay Schematic

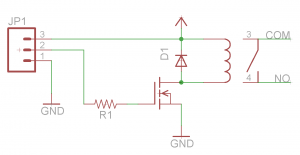
The image below shows how to set up a very basic relay circuit. The circuit consists of the relay, a diode, a MOSFET, and a resistor.

Schematic for the relay PCB.

Schematic for the relay PCB.

The output of the relay simply acts as a switch; for this project it will be hooked up between the heating elements and the AC return path (as discussed in the previous post) of my toaster oven. To protect the transistor (or microcontroller) from any unexpected current or voltage spikes, a protection diode is placed across the relay coil as shown above.

Using the transistor circuit shown above our MSP430 can turn on and off the relay. Since the output from a single I/O pin on the MSP430G2553 cannot exceed 6mA at 3V (we will be using 3.3V), a MOSFET (Metal-Oxide-Semiconductor Field-Effect Transistor) must be used instead of a BJT (Bipolar Junction Transistor). Simply put, a MOSFET amplifies voltage where a BJT amplifies current. Finally, in order to protect the MSP430, a small resistor is placed between the gate and the microcontroller (100 ohms).

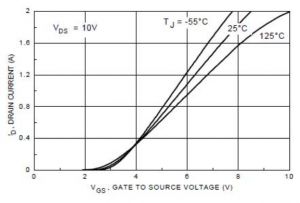
Current Voltage (IV) characteristic of a MOSFET.

Current Voltage (IV) characteristic of a MOSFET.

Now you might ask, can we just use any MOSFET or DIODE? While almost any diode will do, the MOSFET should be able to output 100mA at 5V (for our specific relay) and should have a minimum turn on voltage of 3V or lower. How can you find out if your MOSFET meets these criterion? Check the datasheet. Always check the datasheet. The image above is an excerpt from the BS170D26Z datasheet from Fairchilds; this MOSFET is available on Mouser. Here you can see that the MOSFET can operate at about 150mA when the gate to source voltage is 3.3V.

Putting the Circuit Together

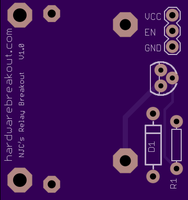
When dealing with high voltages, it is important to be safe. As I keep mentioning, do not embark on this project if you do not know what you are doing. Due to safety issues, all relay circuits should be implemented on a PCB with thick enough traces to handle the current. Here is a picture of the circuit board I designed specifically for this project.

Rendering of my relay PCB from OSHPark.com (top).

Rendering of my relay PCB from OSHPark.com (top).

This circuit board was made using OSHPark.com, a service which has evolved from Laen’s PCB group order. In my opinion, this service is the best for small projects where you need 3 copies or less of a 5 square inch or smaller PCB. Now all we need to do is solder up the circuit board and test it out. The board works great turning on and off my toaster oven!

Conclusion

Stay tuned for more posts on building a toaster oven “reflow oven”. In the next post, we will look into measuring the temperature inside of our toaster oven. Stay tuned!

17 Jul

Modifying a Toaster Oven’s Wiring

In the previous post I discussed building a reflow toaster oven from a systems level perspective. This post will dive into choosing a toaster oven and modifying the internal wiring. Before working on the rest of the system, you should choose your toaster oven. This will ensure that the relay we choose can handle switching the amount of power the toaster oven needs.

As I mentioned in the last post, it is very important to use a toaster oven which has four heating elements and a convection fan. If you buy a cheap toaster oven which has fewer than four heating elements or lacks a convection fan, the oven will not heat up quickly enough nor will the heat on the PCB be evenly distributed.

The toaster oven I will be using for this project is a Black and Decker model which I purchased from Walmart. Despite this oven being somewhat expensive, it has four heating elements and a convection fan making it ideal for this project.  Here is a link to a more expensive toaster oven on Amazon that would also be perfect for this project. Before buying your oven, take a look at its wattage. The wattage should be about 1500W; generally speaking the higher the wattage, the hotter it can get and the faster it will heat up.  My oven is a 1500W oven.

Taking Apart the Oven

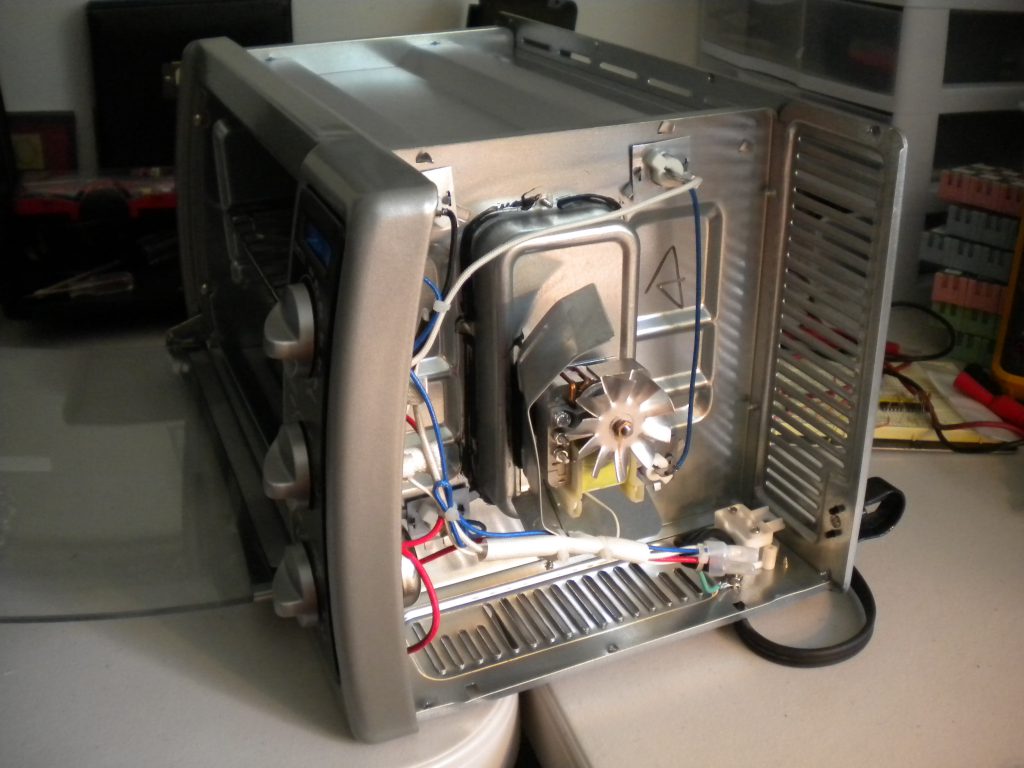
Taking a toaster oven apart is not a trivial matter, at least if you don’t want to break anything! Keep track of where every screw goes and try your hardest not to brute force any part of the oven. Once your oven is apart, it should look something like this.

My oven has three control knobs; the top is the temperature control, the middle sets which heating element is chosen, and the last is a timer.

Please note: This is not something that you should try if you are not familiar with high voltage systems. A toaster oven contains high voltage signals which can kill you. Proceed at your own risk. Do NOT attempt this project unless you really know what you are doing.

Now that I have the oven apart, I took my multimeter to it! I turned the oven on, played around with the settings, and measured the voltage on each heating element. Interestingly enough, the top heating units were driven with 60V (this is half of 120V, the mains voltage in the US). Apparently, having the top heating elements turned all the way on would be overkill for food; this is not true for a reflow oven! We want to have all of the elements turned on at full force, so the switching control will need to be bypassed.

Instead of replacing the timer control knob with a relay circuit, I decided to keep the timer circuit for safety. By setting the timer to 10 minutes at the start of a PCB run, I will have an additional safeguard in case I forget to turn the oven off for any reason. I disconnected the temperature knob and the oven mode knob and wired up the device so that all the heating elements will be completely on when the relay turns on; otherwise everything will be turned off.

The Wiring

How should you wire your toaster oven? While there are many ways to do this, I have chosen the following method.

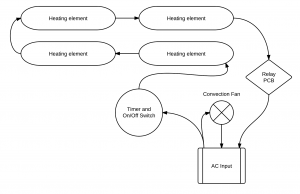
Block diagram of the toaster oven's internal wiring.

Block diagram of the toaster oven’s internal wiring.

The above picture shows a block diagram of how I plan to wire the toaster oven. Note that the relay is connected between the final heating element and the negative AC input. There is no particular reason for putting the relay here, rather than directly in front of or behind the timer. The reason I wired up the relay this way is because it made the wiring significantly more simple on my specific oven. Take a look at your oven and plan ahead; taking the time to do so makes all the difference.

What About the LCD??

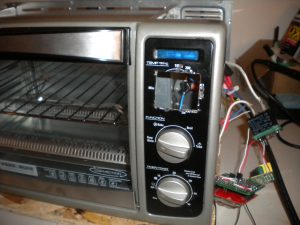
In our last post, I mentioned that there would be an LCD which displays the current temperature and the temperature curve. This is where a Dremel really comes in handy. For those of you with no means to cut metal, you can attach the screen to the outside of the oven and simply bring out the relay control wires to the microcomputer. Since I have a Dremel (which is an amazingly useful tool), I ended up cutting out a square hole for the LCD where the temperature control knob used to be.

The square hole cut for the LCD using my Dremel.

The square hole cut for the LCD using my Dremel.

Be patient when using your Dremel! Otherwise you will have a messy hole for your display; because I was impatient, my cutting job is not as clean as it should be! Oh well!

Preparing for the Relay

Many toaster ovens use a standard #250 tab terminal connector for the internal wiring. This is very useful! You can purchase relays which have this connector built in, allowing you to further separate the high voltage signals from your low voltage signals on the relay PCB. I will discussing this more in the following post on the relay circuit.

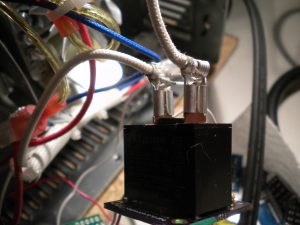
The toaster oven's terminal connectors connected to the relay.

The toaster oven’s terminal connectors connected to the relay.

The image above shows these standard connectors in my toaster oven. These connectors are available at any hardware store (Lowes, Home Depot, Amazon). All you need is a crimper and the correct gauge wire. These connectors really make things easier. The less we have to cut and solder the original wiring, the better.

Conclusion

Be careful when you modify the wiring in your oven. Use zipties to keep your wiring clean and use electrical tape (or liquid electrical tape) to prevent shorts. Our next post will discuss the relay circuit. Stay tuned!