

Yet Another Toaster Oven “Reflow Oven”
At some point, every electronics hobbyist wants to make their project permanent, or even start selling a simple design they have. With the advent of group PCB orders and cheap manufacturing services, such as OSH Park (originally DorkbotPDX PCB Order from Laen) and SeeedStudio’s Fusion PCB Service, the cost of getting a custom PCB made is almost negligible! What great times we live in. Instead of etching boards myself I simply upload my board to OSH Park, verify everything is correct with the automated model of my board, then checkout. About two weeks later, my boards arrive.
Now that custom PCBs are so easy to come by, the most difficult (and possibly most frustrating) part of a project is soldering all the components onto your PCB. Since many of my projects use surface mount devices (SMD or SMT) which are very small, I have wasted many hours simply soldering up my boards. Being that many of my projects are designed to be portable, the smaller the design, the better. This usually means that I will be using chips in my design which are very, very small. For example, I am currently designing a CC430 based circuit board; the CC430 is only available in a QFN package.
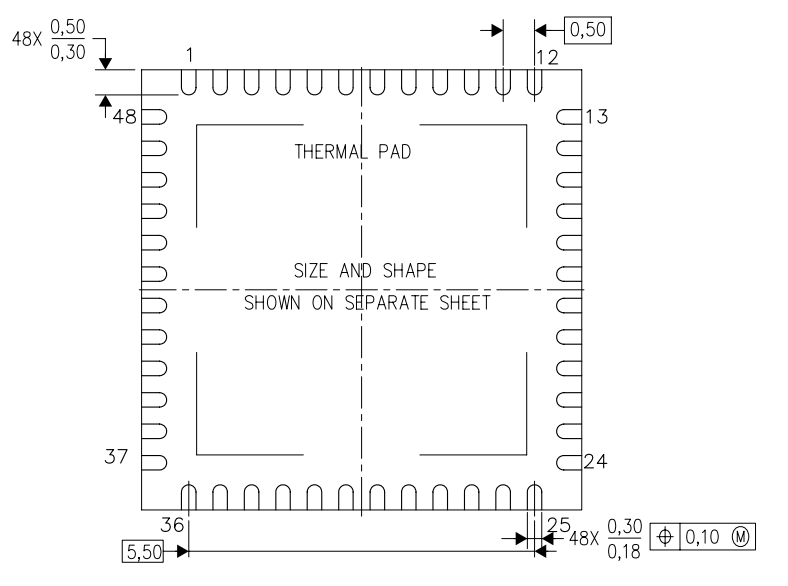
Dimensions of TI’s CC430 QFN Package.
This image, taken from TI’s QFN package pdf, shows how small these chips are. Those measurements are in mm and there are no pins coming off this device; each pad is underneath the chip. To make things even harder, there is a thermal pad completely underneath the chip. While soldering this by hand is possible, it is not fun. Trust me on that.
The Solution
A reflow toaster oven and a simple laser cutter. Why a laser cutter? Using a reflow oven makes things easier, but we still have the problem of putting the correct amount of solder paste on the board. This can be done using a PCB stencil. SparkFun has a great writeup on using PCB stencils, they also mention that you can get cheap stencils made from Pololu. Check out this link for a bit more information on what PCB stencils are and how they are used.
Since I make quite a few designs, buying custom stencil’s from Pololu would get quite expensive; thus the decision to make a laser cutter. After having built a RepRep (3D Printer), I feel that designing a simple laser cutter would be cake. We shall see… The process of building a laser cutter will be investigated after I finish the reflow oven.
The First Step
In this first post, I will discuss the high level system design of the reflow oven. My first step was to figure how I would control the reflow oven and create a block diagram of the system.
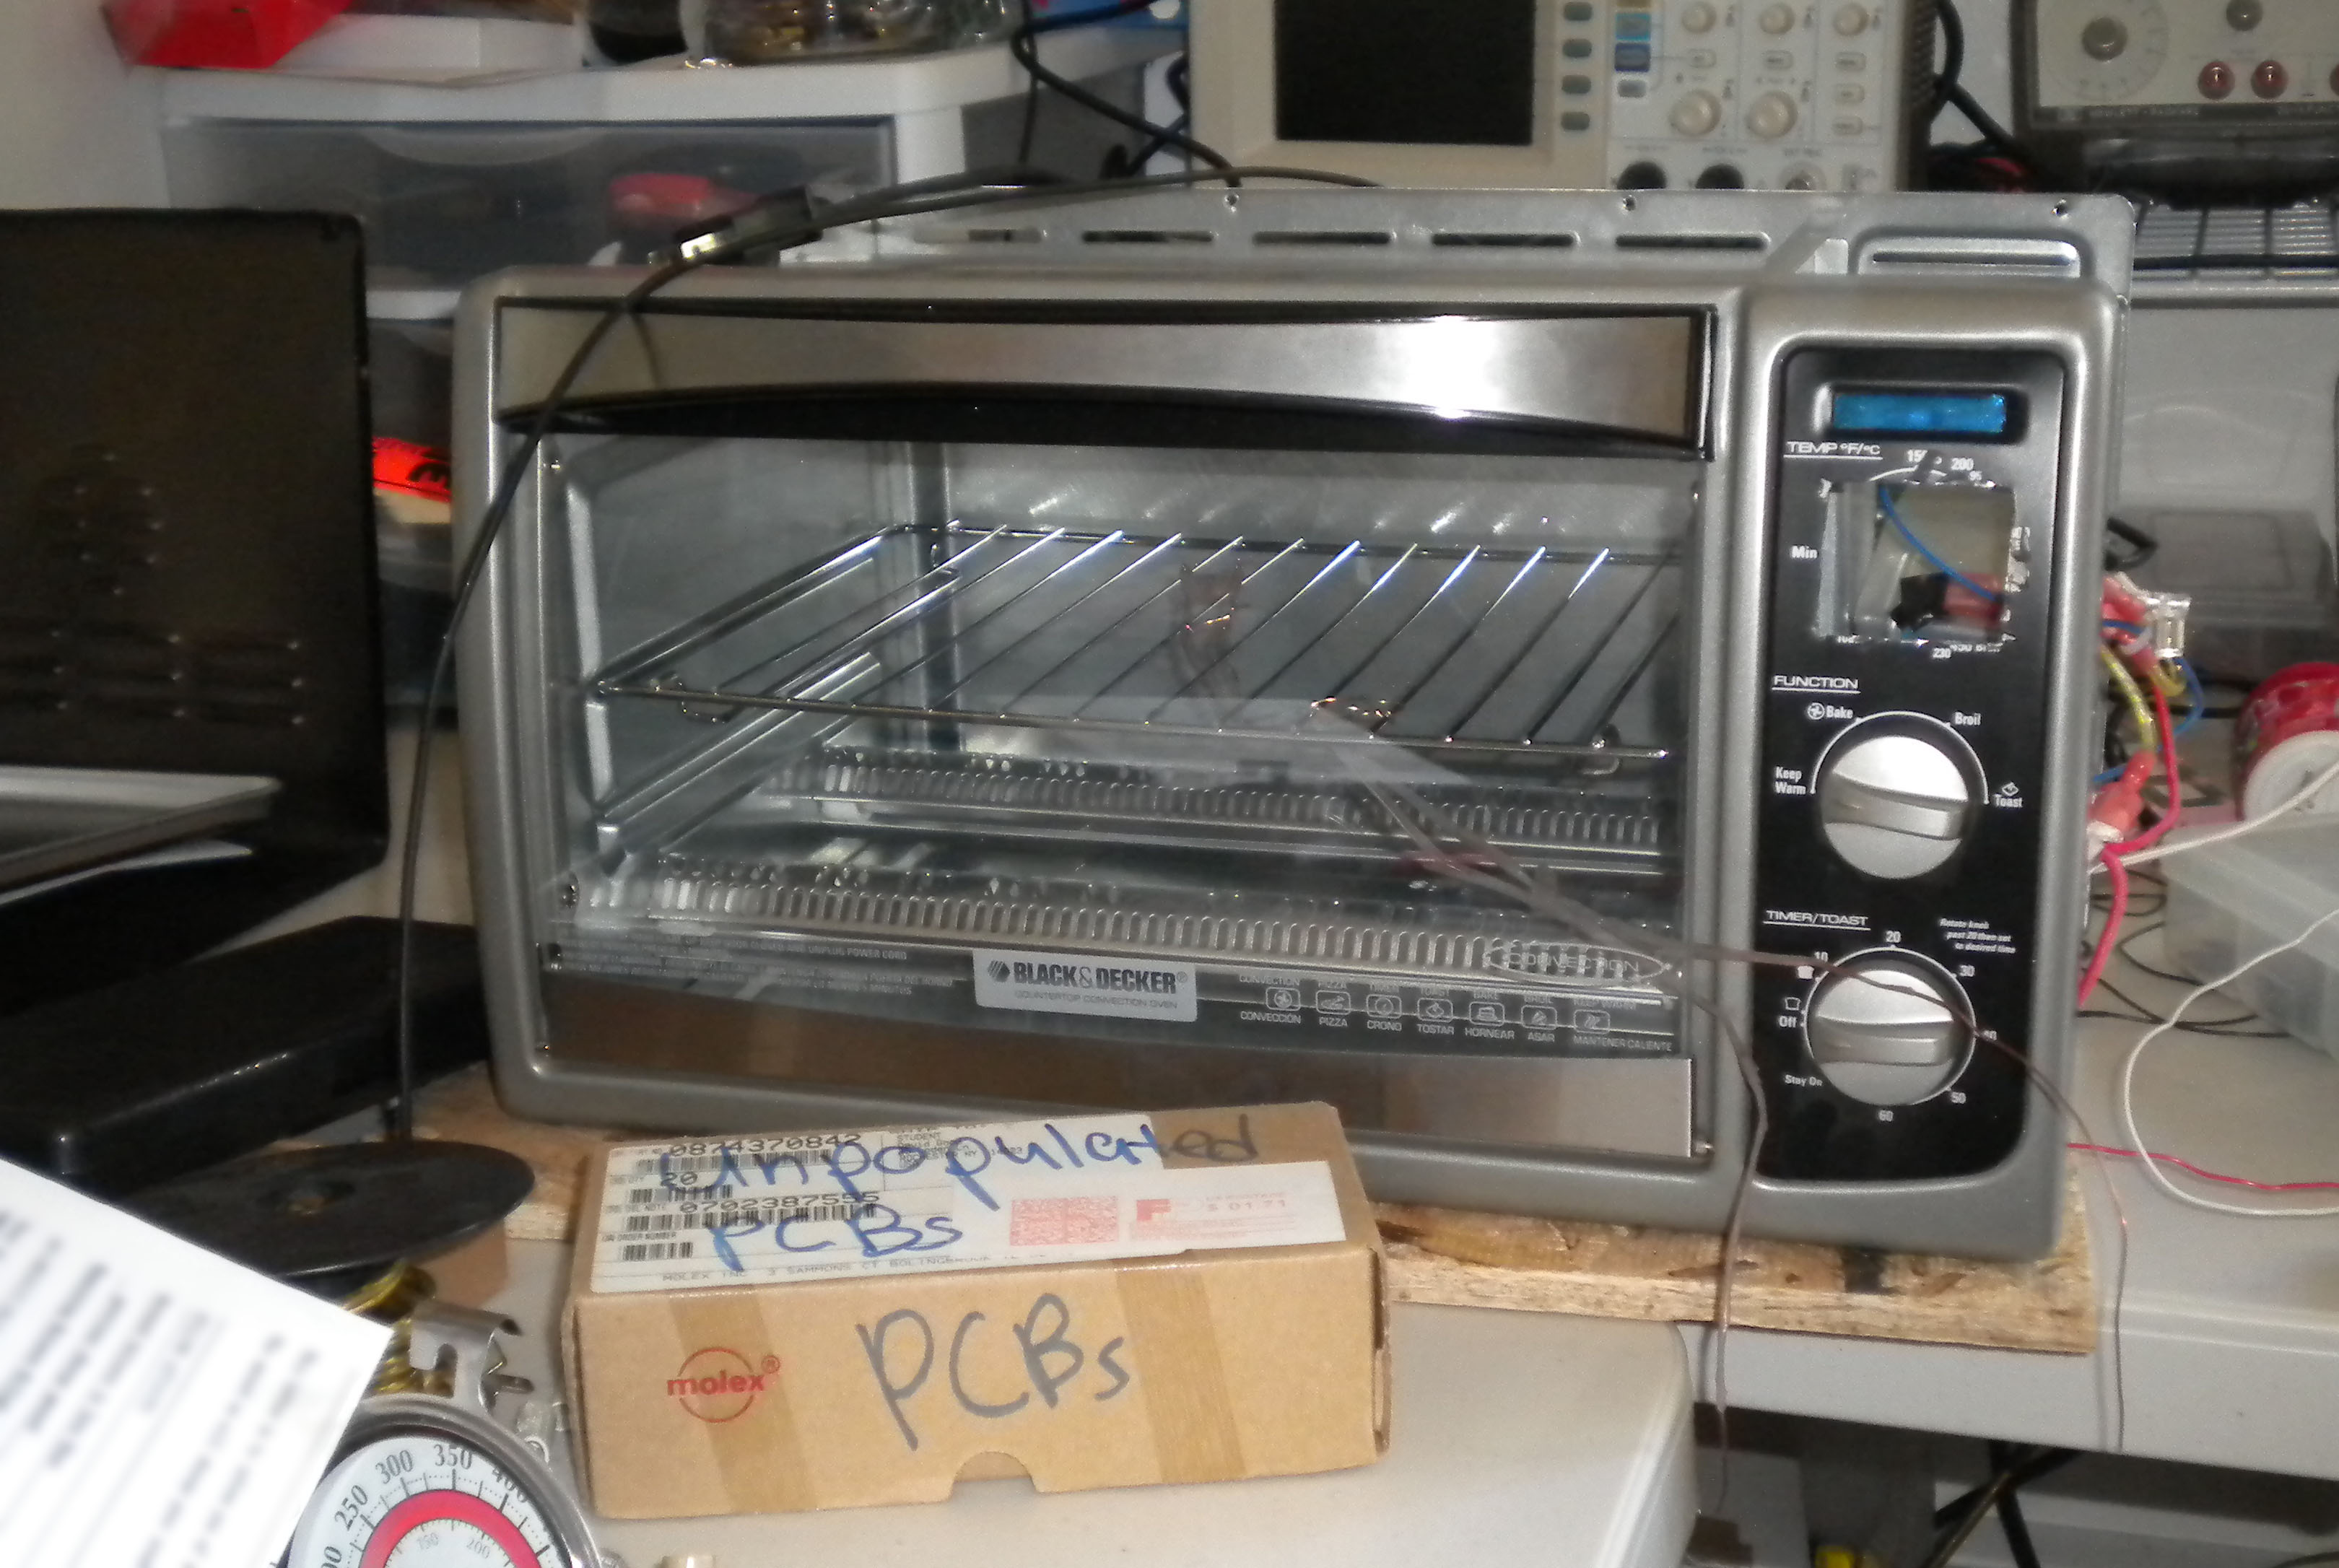
My reflow oven: A work in progress.
The goal here is to modify a regular toaster oven so that you can control the internal temperature accurately over a set duration of time. After doing some initial research and taking apart my toaster oven of choice, I have decided that the best way to control the temperature is to use an electromechanical relay. This method involves turning the heating elements on or off completely. In my design, I will control everything using an MSP430. I will also have a status display built into the toaster.
There are many toaster oven reflow designs out there, some have the electronics built into the oven others consist of a dongle which goes between the toaster oven and the power outlet. While there are benefits to both methods, I will be modifying the toaster oven and will keep all the electronics inside. My goal here is to have a completely self contained reflow oven. Now that we know what the system will consist of, we can draw the block diagram.
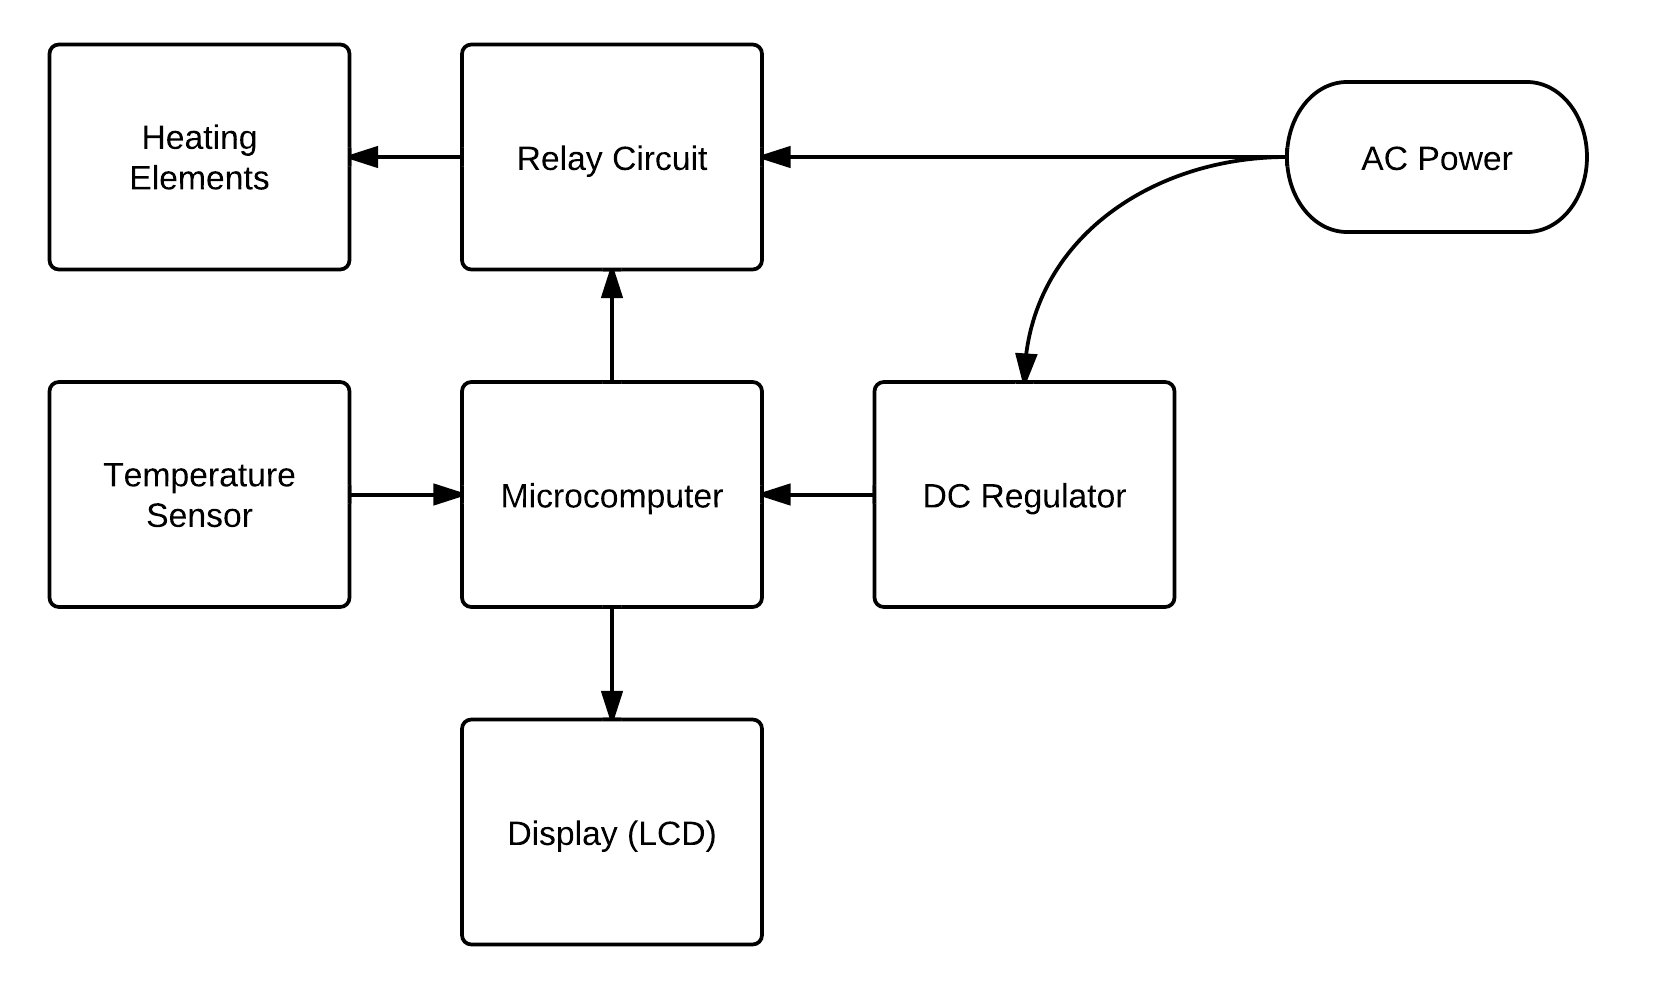
Block Diagram for the Reflow Oven.
Each of these blocks will be discusses in a separate blog post as the design progresses. For now I would like to discuss an initial bill of materials (BOM) and expected cost. Here is a list of what I believe I will need to create a working reflow oven. Please note that this list and the prices are almost guaranteed to change going forward, this current list will give us a general idea of how much the project will cost.
- Toaster Oven – $40
- Relay Circuit Board – $5
- Temperature Sensor – $3
- DC Regulator – $4
- Microcontroller Board – $6
- LCD – $10
In the above list, I have provided links to examples of each part. If you are interested in building a reflow oven, these links are just suggestions on where to get started. The prices do not necessarily reflect what I link to, since you might need additional parts such as resistors, wiring, or a custom PCB.
Useful Links
- Hobbybotics Reflow Controller V8.0
- Laser-Cut Mylar SMT Stencil
- Hack a Toaster Oven for Reflow Soldering
- DIY Lab Equipment: Build Your Own Reflow Oven Out of a Toaster for Precision Temperature Soldering
Conclusion
Hopefully this post has peaked your interest. Stay tuned to watch the whole build process!
Nice informative stuff as always!I am really impressed by the way of presenting your great work and experience about the subject..Great job done keep it up…
Thank you so much for the compliment! I really appreciate your comment and the fact that you are following my blogs. Best regards!
Have you done with your cc430 design ?
is it 2 layer or 4 layer design ??
Bharat,
Sadly, I have not had time to finish testing my two CC430 based boards. Even though the first prototypes have been created, I have no plans to add them to the store for for. Other projects have taken over my time (such as a Bluetooth Low Energy based project). Originally I had decided a USB based access point around the CC430 and also a LaunchPad pin compatible CC430 development board. To answer your second question, both boards contain only two layers.
I second the opinion on using a new toaster oven. I got the B&D Convection oven at wallmart for $39 It has two key features. one is the convection fan to even out temperature, the other is 1500 watt quartz tube elements ( not black calrod types). I tried an older oven ( heavy metal black interior) and it just took forever to get up to temperature. the new ones are light , flimsy metal that heats up fast. The quartz elements are also faster.
dave
You can try oshstencils.com as well. We provide a much less expensive stencil solution.
Thank you for the comment! I have recently tried OSHStencils and plan on writing a review in the near future.
Hi,
There are also some good reflow oven controllers build for toaster ovens. They generally us solid state relays and PWM modulation to regulate temperature. They might be good option to ON/OFF systems based on mechanical relays.
Hera are some examples
http://www.nelectronics.dyndns.org
https://www.sparkfun.com/products/retired/81
I think the relay is going to really limit the lifespan of the whole thing. Opto-isolator driven triac control is much, much better, and competitive in terms of cost (disclaimer – I sell the bits for such a system in my store).
Compared to a solid state relay or a triac, you are correct. For this project though, I am not worried about it. The relay is rated for 100,000 switches when using a resistive load, which should give me over 1000 runs. Very good point though.
I just like the helpful info you provide for
your articles. I’ll bookmark your weblog and check once more
here regularly. I’m slightly sure I’ll be informed lots of new stuff right
here! Good luck for the following!