

Organize Components the Easy Way
Sooner or later, everyone struggles with organizing their components. Creating a single system for surface mount devices, through hole components, larger components, and everything inbetween can be a daunting task. This post describes how I organize my system and gives you all the tools needed to organize yours in a similar fashion.
I have tried countless different ways of organizing my components and still have remnants of these systems cluttering up my home lab. Old through hole storage cabinets like this one and this one, do not work well with surface mount devices. Even when using small component storage boxes, I seem to always have trouble remembering the less common properties of my components (such as capacitor voltage ratings). I never remember what voltage or wattage my components can be used at. Furthermore, when I run out of a part, I have to spend a lot of time finding what to replace it with (because of course I didn’t write down the part number somewhere easily accessible).
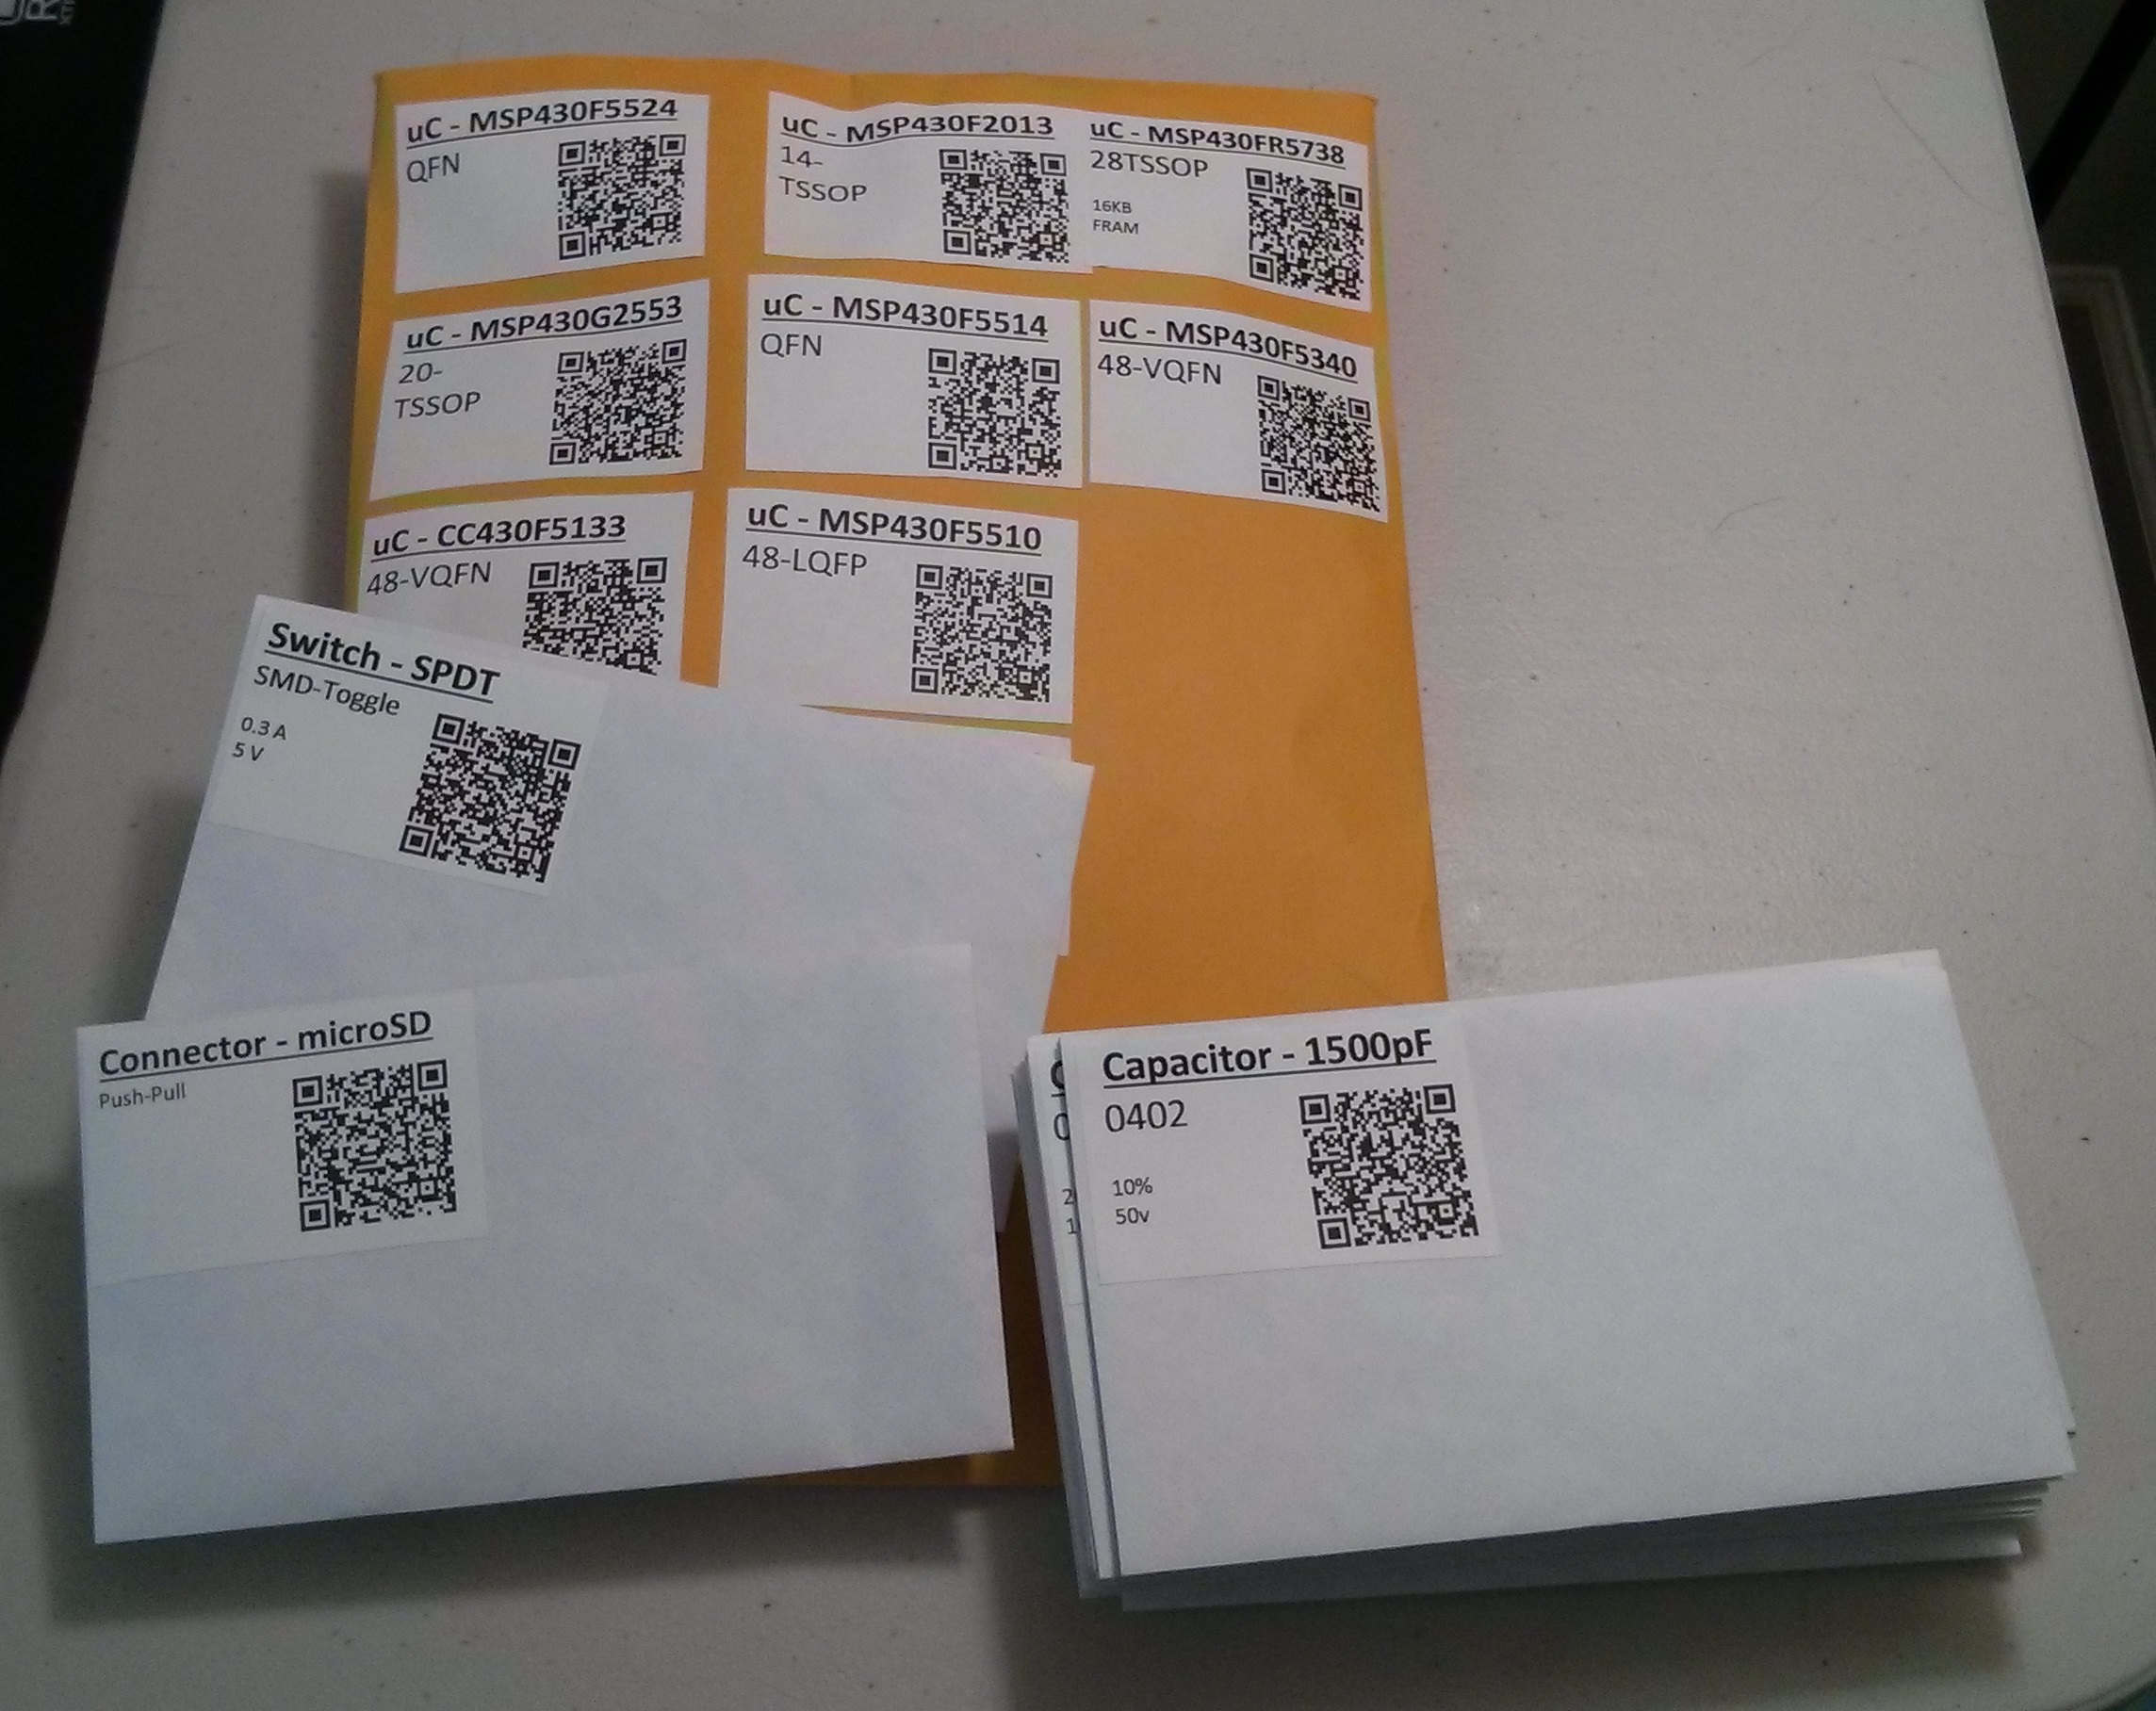
After reading about a system on Hackaday which uses small envelopes to store SMD, I decided to make my own system for labeled envelopes. Over time, I will be converting all of my components to this new system which uses envelopes and labels with QR codes to organize everything. As you can see in the picture below, it is super easy to expand and find all the parts you need.
Coming up with and sticking to an organizational system for your electronic parts can be very difficult. Plus, I am always ordering new parts or I cannot find a specific part that I already have to order more. This system is simple to use and stick with.
Rather than convert all of my parts to this system in one go, I found it easier to start with a large order from Mouser. The key to this system is a spreadsheet which has all of the information for the parts you ordered. It takes a few minutes add each component to the spreadsheet when a new order comes in. Using Excel and Word, labels are automatically created and can be printed out with almost no additional effort. Continue reading for a quick overview each file.
Features:
- Requires only Excel and Word
- Automatically creates a QR code for every printed out label
- Stores part numbers and specificiations
- Links to the suppliers website
- Requires very little storage space!
The smaller parts are stored in small envelopes which can be stored in an envelop box (or really anywhere). Larger components, and components which require ant-static protection go into a larger folder (the the picture above). This makes finding the chip you need infinitely easier and more manageable.
The Word and Excel files (see the end of the post) are all that you need to create your own custom QR code labeling system. Use them and modify them however you see fit!
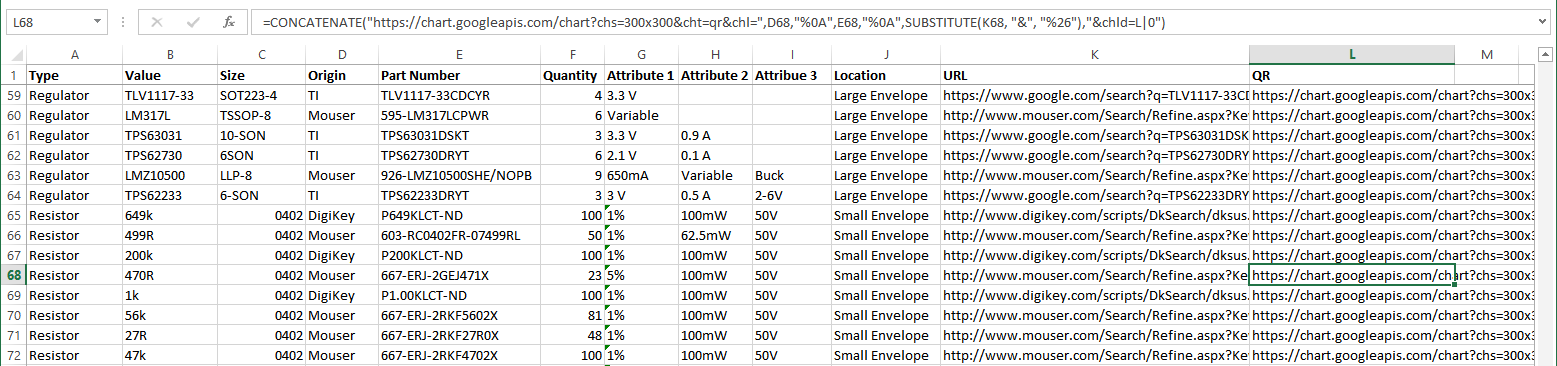
It can be quite daunting figuring out a way to automatically embed a QR code for each label, but hopefully you will find my example useful. The information for the QR code is combined in Excel into a single URL. This URL interfaces with Google’s QR code API to create the QR image in Word (see the image below). Google’s API is quite easy to use once you figure out how to format the URL and information. Hopefully you will find my example files useful.
The magic happens in the Word document. Using mail-merge, the labels can automatically be generated from the Excel spreadsheet.
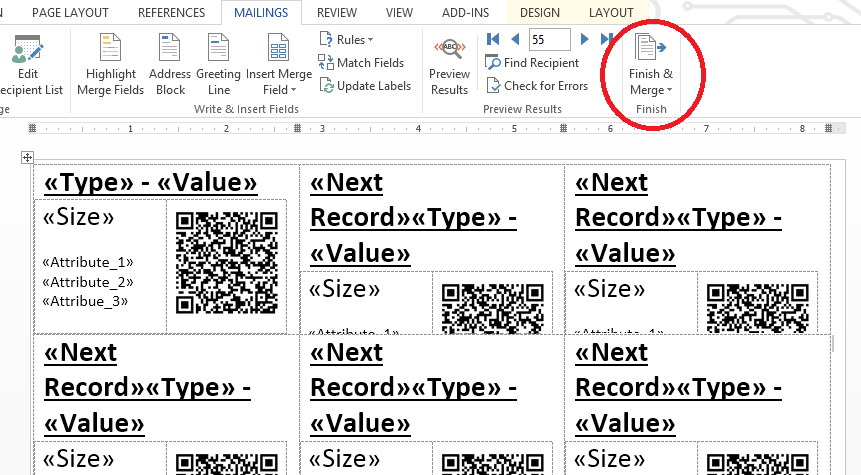
Once everything is ready, the trick for generating the final labels is to click on “Finish & Merge”, then click “Edit Individual Documents…”. This will create a new document for your labels. Be sure to update the QR fields in this document by pressing “F9”. You can now fix any layout issues, such as reducing the font size on lines which overflow and mess up the rest of the labels.
How do you organize your parts? This project could easily be expanded using Python to create a full fledged parts management system if need be. Enjoy!
Files:
- Excel Spreadsheet
- Word Document
Pingback: rndm(mod) » Hackaday Links: October 6, 2013
Pingback: Hackaday Links: October 6, 2013 — Blog of MPRosa
This is cool, but i would omit the QR stuff… unless you are selling items… Why use QR? or barcodes? You have to search by hand anyway. Its not like you can scan the code on your phone and the item is pulled out from the bins or what every you use to hold this stuff. The QR just adds time if you ask me. Also if you can scan using a cell phone then it ask you how many parts are you using and it updated the database then it would be cool.
I honestly don’t know about QR code since it would require you to carry a camera-capable device (and I tend to NOT carry a cell phone around at home) but a barcode would be useful – barcode scanners are dirt cheap these days, it reads in a blink of an eye and feeds the input as a text string (and most can be configured to press Enter for you after they read the code, too) – very easy to integrate.
But as far as the “unless you are selling” comment – not necessarily. My projects usually start with me pulling component from all sorts of assorted storage into a single project bin. Having a barcode on the storage containers would be useful for checking out a component before placing it into the project bin – basically, you need to know that you storage now has one less of this item. It is very laborious to do by hand, so I don’t, which makes parts managing a mess. Just today I ran into an issue with missing a proper size power socket with a thicker center pin. Had I known I used up the last one months ago, I would have easily reordered – it’s a very cheap item if it’s just added to another order. But if I have to order it by itself, just the shipping will make it 4 times more expensive, plus the added wait time.
So, getting back to the QR codes – I do have an idea (this post was also very helpful) about how to print them out. But how do you read it and in general, use it effectively? Can it be made to work as quick as point-and-scan barcode reading?
The QR code is used to link to the suppliers website.
While this would not be useful for those without picture phones, the author no doubt has a picture phone that allows him to use this technology.
This can be modified of course, a link to the suppliers website as well as a link to the part’s speck sheet can replace the QR code. A part number or UPC code would enable one to find the part on the suppliers website much faster.
First off, thank you for the comments!
I agree, the QR codes would be quite useless if one does not have an easy way of scanning them. My desktop has a webcam on it, which I use to scan the QR codes. For those of you using Windows 8, there is an “app” called scan. It works quite well and automatically launches the suppliers website where I can instantly order more parts or look up the datasheet.
I’m sure there exists a Python library for reading QR codes from a webcam. I think it would be awesome to use that for automatically updating the database. The biggest problem I find with this system, is that I never update the quantity I have of each part. You could even use one of those USB microscopes to scan QR codes. In the future, I could see using that with a Python program. Having an external webcam that reaches to your workstation could definitely help make this more usable.